Warning: Undefined array key "type" in /container/application/public/back9/b9/wp-content/plugins/wpseo-video/classes/class-wpseo-video-utils.php on line 95
Website Development Archives - Page 4 of 4 - Back9 Creative

How to create Google Sitemap

You wouldn’t design a new kitchen without drawing up a plan first, would you? Similarly, you’d never want to design a website without creating a Google sitemap.

A sitemap is a file of code that lives on your web server and lists all of the relevant URLs that are in the structure of your website. It helps search engine web crawlers determine the structure of the site so they can crawl it more intelligently.

Here’s an example of what a sitemap file might look like:

Sample-Sitemap-code

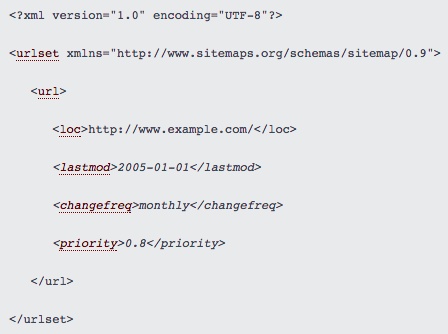
Image Credit: Sitemaps.org

We create sitemaps when we first design your website, add pages to it, and/or redesign it. It’s kind of like a “floor plan” for the site, which especially comes in handy whenever the site gets changed. Along with boosting SEO, sitemaps can also help define a site’s navigation scheme so you avoid internal linking issues.

You might be thinking to yourself, “But I thought sitemaps were more visual, like a web”. That’s a visual sitemap, as opposed to an XML sitemap — the latter is what we’ve been talking about so far.

4 Steps to Building a Sitemap

1) Research & Plan

When we first begin planning your sitemap, we think about questions like: What are your website design goals? Who’s your target audience, and what do they want to see?

It’s also important to keep in mind each search engine’s requirements. The last thing we want to do is break the path of a visitor getting from a search engine to your website. Google’s, Bing’s, Yahoo!’s, and others’ requirements are fairly similar, but you’ll want to make sure you’re not breaking any specific requirements for any of them. This is especially true if you see a lot of your traffic is coming from a specific search engine.

Note: We generally only submit sitemaps to Google, but can submit to Bing and Yahoo if you choose.

For the requirements and rules for sitemaps, check out:

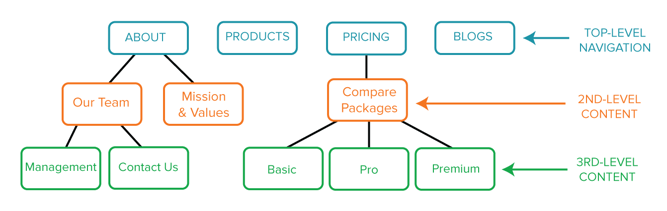
2) Define the Top-Level Navigation Structure

What do you want your homepage to link to? This will provide the foundation for your site’s structure, and will allow your site to grow.

navigation-1.png

The structure of your website plays a huge role in your site’s SEO, so it’s important to plan top-level navigation structure carefully. Specific attention should be given to the website’s depth. The further away a page is from the original homepage URL of your site, the worse it is for that page’s Search engine optimisation.

In other words, a shallow website (one that requires three or fewer clicks to reach each page) is much better for SEO than a deep website, according to Search Engine Journal.

Unfortunately, it’s difficult to give general advice here as best practices can vary significantly by industry, company type, and so on. This high;ights the importance of understanding your industry and the marketing landscape in which you operate – If you want to discuss this further with us, please feel free to book a free 45min consultation.

3) Define the Second- & Third-Level Content

This is where creating visual sitemaps can come in handy. Once your homepage’s navigation structure is set,  we brainstorm and map out the pages that are two or three levels deeper into your website. This might be your “About Us” page, your team page, your hiring page and your blog etc.

Depending on the complexity of your website, you may only need two levels, or you may need up to four. And as you think out the deeper parts of your website, you may find you need to tweak the top-level navigation — and that’s okay.

visual-sitemap-example.png

4. Write the XML Sitemap & Submit it to Search Engines

Once your website’s planned out, designed and coded, it’s time for our web development team to also create the XML sitemap to put on your web server, and submit it to the search engine.

When we first publish your website and each time you go through a significant site redesign, the sitemap will need to be resubmitted, so that search engines will be able to tell your homepage from your “About Us” page from your team page and so on.

Unless you’re using a platform that automatically updates your sitemap, you’ll need to update the sitemap yourself (or have us do it for you) and resubmit any time you make significant changes to your website, because if your website sucks, it won’t convert.

But remember, you’ll still either have to rely on search engines to pick up new pages organically. That means if you’ve made a really significant change to your site’s structure,  we might need to manually submit it.)

Below are step-by-step instructions for submitting a sitemap to Google, and then to Bing and Yahoo!.

How to submit a sitemap to Google:

  1. Sign in to Google Webmaster Tools.
  2. Click “Add a Site.”
  3. Enter the URL for your company (e.g. http://www.yourdomain.com). Click “Continue.”
  4. Click “Crawl” on the left-hand side of the page, and choose “Sitemaps.”
  5. Click “Add/Test Sitemap.”
  6. Enter sitemap.xml after “http://www.yourdomain.com/”.
  7. Click “Submit Sitemap.”

(For more details, click here.)

How to submit a sitemap to Bing or Yahoo!:

  1. Sign in to Bing Webmaster Tools.
  2. On the My Sites page, enter the URL for your company (e.g. http://www.yourdomain.com). Click “Add.”
  3. In the “Add a sitemap” field, enter http://www.yourdomain.com/sitemap.xml. (Replace “yourdomain” with your company’s URL.)
  4. Complete the rest of the required fields on the page, and click “Save.”

(For more details, click here.)

What If I Want to Add Webpages Later?

Once you define and submit your sitemap the first time, chances are you’ll want to tweak and add pages to your website every so often — and that’s completely fine. But keep in mind that if your website isn’t built on a platform that automatically generates a new sitemap and updates it on your web server when new pages are added, then every time you add a page — any page — to your website, that page will be missing from the sitemap that search engines see.

Remember, Google and other search engines will pick up the sitemap organically as long as you’ve updated the sitemap.xml file on your web server. But if you want to try to index your content the fastest way possible, you could resubmit your sitemap after publishing a new page — and it’s possible that Google would pick it up more quickly.

Once you’ve created and submitted your XML sitemap to search engines, you can start working on other fun stuff like your website’s design.

This is of course just one step in the process and it helps if you’re a little bit tech savvy.  If you need some help with a sitemap on a pre-existing website – please be aware there are some variables, (such as the platform you are using or if we can access the raw code via the cPanel on you site) and there may be no guarantee that we can help. but like anything in life, if you don’t ask, you don’t get so please feel free to get in touch, otherwise… Happy site-mapping!

5 Ways to Help Reduce Your Website’s Page Loading Speed

The old adage “patience is a virtue” doesn’t really apply online.

When it comes to website loading speed, even a one-second delay can dramatically reduce pageviews, customer satisfaction, and drop conversions.

The speed of your website even affects your website’s performance and subsequently your organic search rankings for SEO. Since 2010, Google has been accounting for a site speed in its algorithm.

So what’s the biggest factor contributing to your page speed?

Size does matter.

It takes browsers time to download the code that makes up your page. It has to download your HTML, your stylesheets, your scripts and your images. All this means it can take a while to download all that data.

As web users expect more engaging website design, the size of a site’s resource files will continue to grow. Each new feature requires a new script or stylesheet that weighs down your site just a little more.

How do you make sure your site is up to speed?

There are some great resources for analysing your site’s speed. Google’s PageSpeed Insights, and GTMetrix are the most popular. Both services will analyse your site and tell you where you’re falling behind.

A little warning: the results can be a bit daunting sometimes, but most fixes are relatively quick and easy. You might not fix everything the speed service recommends, but you should fix enough to make the site experience better for your visitors.

Let’s learn how to speed things up!

Out-of-the-box template solutions like WordPress and Joomla for example are great but do require the know how a little manual labour to get up to speed – It can all be quite daunting, so we are here to help – Obviously expert help comes at a price, but sometimes an investment in the right help can save you time and money in the long run…

Read about the benefits of a custom designed website here… 

Now let’s look at some essential speed solutions that every webmaster should consider.

1. Optimize Images

Images are one of the most common bandwidth hogs on the web.

The first way to optimize your images is to scale them appropriately.

Many webmasters use huge images and then scale them down with CSS. What they don’t realize is that your browser still loads them at the full image size.

For example, if you have an image that is 1000 x 1000 pixels, but you have scaled it down to 100 x 100 pixels, your browser must load ten times more than necessary.

Scale your images before you upload them to your site, so you don’t ask for more from your visitors than you should.

Take a look at the size difference when we scaled down one of our images:

speed-01-scaling

The second way to optimize your images is to compress them.

There are several free online tools for image compression, such astinypng.com, that can reduce your image sizes dramatically without losing quality. You can see size reductions anywhere from 25% to 80%!

2. Browser Caching

Why make visitors download the same things every time they load a page?

Enabling browser caching lets you temporarily store some data on a visitors’ computer, so they don’t have to wait for it to load every time they visit your page.

How long you store the data depends on their browser configuration and your server-side cache settings.

To set up browser caching on your server, check out the resources below or contact your hosting company:

3. Compression

Enabling compression is like putting your website into a zip file.

Compression can dramatically reduce your page’s size and thereby increase its speed. According to Digital.gov, The smaller the better, when it comes to page resources.

Compression can knock off 50 – 70% from your HTML and CSS files! That’s a ton of data your visitor won’t have to download.

Compression is a server setting, so how you implement it will depend on your webserver and its settings. Below are some resources for the most common webservers. If you don’t see yours, contact your hosting company to see what they can do.

4. Optimize Your CSS

Your CSS loads before people see your site. The longer it takes for them to download your CSS, the longer they wait. And the slower your website loading speed.

Optimized CSS means your files will download faster, giving your visitors quicker access to your pages.

Start by asking yourself, “do I use all of my CSS?” If not, get rid of the superfluous code in your files. Every little bit of wasted data can add up until your website’s snail-pace speed scares away your visitors.

Next, you should minimize your CSS files. Extra spaces in your stylesheets increase file size. CSS minimization removes those extra spaces from your code to ensure your file is at its smallest size.

So how do you minimize your CSS files?

First, see if your CMS already minimizes your CSS or if there’s an option for it. HubSpot, for example, already minimizes your CSS by default whereas WordPress or Joomla do not.

If your CMS does not have a minimize CSS option, you can use a free online service like CSS Minifier to minimize your files. Simply paste in your CSS and hit “Compress” to see your newly minimized stylesheet.

Minimizing your resource files is a great way to knock some size off your files. Trust me—those little spaces add up quickly.

speed-02-minification

5. Keep Your Scripts Below the Fold to improve website loading speed

Javascript files can load after the rest of your page, but if you put them all before your content—as many sites do—they will load before your content does.

This affects your website loading speed and means your visitors must wait until your Javascript files load before they see your page, and we know how much they like waiting.

The simplest solution is to place your external Javascript files at the bottom of your page, just before the close of your body tag. Now more of your site can load before your scripts.

Another method that allows even more control is to use the defer or async attributes when placing external .js files on your site.

Both defer and async are very useful, but make sure you understand the difference before you use them:

  • Async tags load the scripts while the rest of the page loads, but this means scripts can be loaded out of order. Basically, lighter files load first. This might be fine for some scripts, but can be disastrous for others.
  • The defer attribute loads your scripts after your content has finished loading. It also runs the scripts in order. Just make sure your scripts run so late without breaking your site.

All you need to do is add a simple word in your <script> tags.

For example, you can take your original script

<script type=”text/javascript” src=”/path/filename.js”></script>

And add the little code to ensure it loads when you want it.

<script type=”text/javascript” src=”/path/filename.js” defer></script>
<script type=”text/javascript” src=”/path/filename.js” async></script>

The importance of your scripts will determine if they get an attribute and which attribute you tack on. More essential scripts should probably have the async attribute so they can load ASAP without holding up the rest of your content. The nonessential ones, however, should wait until the end to ensure visitors see your page faster.

But for the best website loading speed, always make sure you test each script to ensure the attribute doesn’t break your site!

Conclusion

As online users demand a richer online experience, the size of our pages will continue to grow. There will be flashier Javascript, more CSS tricks and more third-party analytics to weigh down our sites,  but we can’t let this bog us down.

A little attention will go a long way—remember, just a one-second delay is all it takes to lose a lead, so you need to also think about what those lost leads may cost and  whether you are using an out-of-the-box template or a custom design.

Get-Free-Website-Audit-Button