
The Complete Guide to Selling Products Online
Interested? Keep on scrolling to read the full e-book!
Don’t have time to read it now? Click the ‘Get my eBook’ and we’ll send you a pdf to read in your own time.


One of the best ways your business can compete in modern days is to have the option to sell online. Most people prefer to do research online. First, they’ll find a product that solves the issue they have. Then they’ll search for a place to purchase that product. If your store isn’t online, you can potentially be missing a huge portion of sales.
When done properly, selling online opens your business up on a massive scale. The key part of this is “doing it properly”. Taking a couple of minutes to throw up an online store isn’t going to bring in the dollars.
For it to be successful, you need to think of selling online as an investment. There are a lot of things to consider. So where do you start?
In this guide, we’ll cover the important steps you’ll need to consider from having an idea to building a viable online store.
Are you ready to get started selling online? Read on and let’s get started!
1. WHY SELL ONLINE?
Can selling online really make a difference?
Why you should sell online
Not long ago, it was common to find many businesses that list their products online. Most of them would have no prices or options to buy on the site. The idea was that people would see a product they like, drive to the store to buy it, and maybe pick up a few other items while they’re already there. It might seem like a solid idea, but now it’s an outdated one. Websites can suggest great pairs of products right there while you’re shopping. And while a lot of people were resistant to shopping online, the COVID Pandemic forced it upon them–and a lot of people found they preferred it. In the US for instance, online shopping rates doubled compared to the 2 years previous, and the trend continues to go strong.
This means that when possible, businesses should be considering adding e-commerce options–options for purchasing products directly from the website–to make sure that customers can find what they’re looking for and can buy what they want easily. Having an e-commerce option lets visitors decide they want something and buy it on the spot. Without it, you could be missing out on people on the final stage of the Buyer’s Journey, the ones ready to buy now. If you have shipping options, you can also reach people across the country who would never come into your physical store. If you don’t sell online, you could be missing out from people from all over who want what you have to offer!

How much do you sell online?
You don’t necessarily have to sell all of your goods online. In fact, many retailers keep some of their larger or more unique items as in-store only purchases. If selling an item online would be too complicated or not worth the effort, feel free to leave it off. Ideally, if you do this, it’s helpful to have some indication that you have more products available.
So why would you want to not want to sell some items online? Here are some real-world examples we’ve come across:
- Item is too bulky or heavy. If you want to use flat-rate or free shipping, you’ll lose money fast with heavy or bulky items. You can get around this with oversized shipping, but you’ll have to set that up per product–which can be challenging and complex, especially if you’re building the site yourself.
- Sell price is too low. Small orders of inexpensive products can cost you more time than the sale is worth. Selling a single screw or disposable mask for instance means you’ll have to sort packing and shipping for these items, admin time that adds up. You can get around this with a minimum order amount but some stores choose to avoid these small sale items instead of imposing a restriction.
- Bulk items. One of the benefits of bulk items is that the customer can choose exactly what they want. And not everyone is great at visualising weights, so it can be challenging for a customer to choose the right amount. Some stores limit bulk items to specific size increments, but that means you’ll need to go and weigh out the item yourself for each sale.
Whether you’re selling your entire catalogue or a limited selection, having your products online lets potential customers know what you have to offer.
How to get started
Once you decide to start online, how do you get started? We’ve got you covered; simply follow these 9 steps to start selling products online!
- Decide what items you want to sell online and choose an e-commerce platform.
- Decide on and purchase an inventory management system.
- Choose and purchase a payment gateway.
- Build the website and integrate inventory management and payment gateway systems into your site.
- Write out descriptions of all your items, take/upload images and videos, and publish them to the site.
- Sort out a shipping option (if having items delivered).
- Customise your checkout process to fit your ideal customers.
- Preview and test your new online store and ensure that everything is working.
- Refine and update your processes based on how customers buy products and use the site.
We’ll cover each of these in more detail throughout this ebook.
Glossary
e-commerce: Buying and/or selling goods and/or services online.
Buyer’s Journey The process buyers go through when deciding to buy a product. The three stages are Awareness, Consideration, and Decision.
2. CHOOSING AN E-COMMERCE PLATFORM
Before you get into the nitty-gritty of selling online, you need to decide what products to sell and what e-commerce platform is right for you.
How to choose an e-commerce platform
Choosing an e-commerce platform is one of the most important choices you’ll make when deciding to sell online. And no matter what paid affiliates will tell you, there’s not a single one that stands above the rest. Different platforms have different pros and cons because they were designed with a different audience and functionality in mind. With e-commerce sales on the rise, new platforms are appearing all the time with new features and benefits. However, to keep things simple we’re going to focus on some of the bigger players in NZ, namely Shopify, OpenCart, Squarespace, Magento, Wix, and WordPress with WooCommerce.
We’ll go over each of these platforms in more detail to help you decide which will be best for you based on your budget, design skills, goals, and tech experience.
Shopify
As of this writing, Shopify is the most popular e-commerce platform, designed specifically to sell products online.
Shopify’s goal is to do the hard work for you when it comes to setting up your online store. One of the biggest benefits of the platform is that you don’t need to have tech skills at all. You can get an online store up in a matter of minutes with their easy-to-use drag-and-drop editor. There are also options for dropshipping, something many small players are doing to compete with big stores, which you can find out more about in the ultimate guide to dropshipping and how to create a unique dropshipping store. With Shopify, you can get a store started quickly that looks good and feels familiar to people.
However, if you want the edge in Search Engine Optimisation so you can get found on Google, Shopify’s limit of customisation can hurt you here, especially on lower subscription tiers. It can also be difficult to export your posts and information if you decide to try out another platform. You can also run into scaling issues if your business starts to grow because there are limited options for customisation. The familiarity may work against you too; your store will look similar to a lot of other ones due to the limited themes, which means it’s harder to stand out and show off what makes you unique.
What does Shopify Cost?
Shopify has a free 14-day trial (no credit card required) and then starts at $29/mo (USD) for the basic plan.

You can see a full breakdown of plan features on the Shopify website.
Some other features of Shopify include:
- Website hosting is part of the package
- Drag-and-drop customisation
- 24/7 Support
- Abandoned cart recovery
- Unlimited file storage
When should I use Shopify?
If you’re okay with adding products on your own and want a good-looking, easy to use store and aren’t worried about extensive customisation, Shopify could be a good choice for you.
OpenCart
OpenCart aims to keep things straightforward by making it easy for you to set up a store. But the main draw? It’s free… Well, to a certain extent. Added functionality like tracking abandoned carts for Remarketing comes with a cost through plugins. Some themes are also paid as premium options. Even still, OpenCart is perhaps the cheapest ecommerce platform on the market to get a basic shop up and running.
However, that free price comes with some costs. Customisation is difficult and although the software is Open Source–The code is freely available to edit–actually making those changes and getting the look, feel, and design you want can require some serious coding skills. You’ll still need to sort out hosting yourself as well as do website maintenance on your own.
How much does OpenCart cost?
OpenCart is free to use, but you have to add it to another platform like WordPress.
Some features of OpenCart include:
- Free to use at its most basic level without plugins and extensions.
- Fast to set up with a built-in product management system.
- Unlimited products can be added.
- One account can manage multiple stores.
- Built-in sales and coupon codes tools.
- Multiple currencies and languages are supported.
When should I use OpenCart?
If your goal is to get a shop up fast, easy, and cheap, OpenCart may be a good option for you. It also helps if you have a little bit of technical knowledge–you’ll need to set up some things on your own to get your shop up and running.
Squarespace
Although it’s a template site–meaning you have to choose from a set of templates for your website instead of building it custom–Squarespace is known for having some of the best-looking templates around. Designed with artistic professionals in mind, Squarespace believes design is not a luxury reserved only for the elite. This means that all of the templates on Squarespace are free, although you can still buy 3rd party ones to use on your site at a cost if you’d prefer.
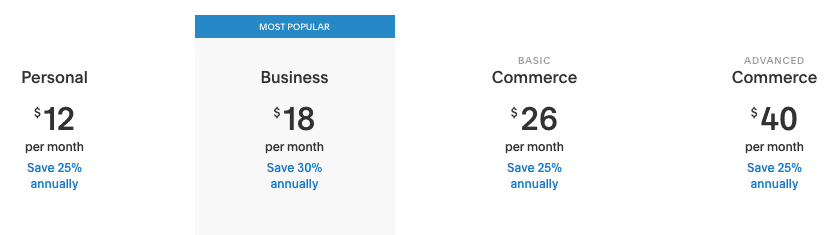
Squarespace is a WYSIWYG editor, meaning you can visually edit your site without code. On the ecommerce side, Squarespace has a few subscription levels specifically designed for selling products and services online. The templates can really make your products pop–so long as you’ve invested in taking great photos or videos of your products already. Their basic ecommerce package starts at $26 USD per month with no transaction fees.
However, Squarespace is limited when it comes to features like support and SEO. Adding extra features can be a challenge as well unless you use the Squarespace Plug-in store, which has limited options compared to some other platforms. And even though many of the templates look good, they’re still templates, so won’t be as good or unique as a custom-designed website.
What does Squarespace cost?
Squarespace starts at $12/month USD for a Personal plan up to $40/month USD for Advanced Commerce. To sell products you’ll need to be at least on the Basic Commerce site at $26/month USD. See full Squarespace pricing here.
Some other features of Squarespace include:
- A free custom domain for one year to help you get started.
- Optimised templates for mobile, desktop, and tablet.
- A business email (email@yourbusiness.co.nz) through Gmail free for the first year.
- Built-in ad options like pop-ups and banners.
- Marketing options like abandoned cart recovery (Highest tier only).
When should I use Squarespace?
Squarespace claims that design is one of their primary focuses. And for a template site builder, they have some of the best designs in the business. This makes them an ideal choice if you have a small store with bespoke products where the look of your products is a major part of the appeal, like for artists, photographers, and beauty products.
Magento
Magento is one of the most popular ecommerce platforms around right now, with about 20% of all sites that sell online doing so through Magento. It comes stocked with an impressive array of features, including shipping and inventory management, customer logins with saved orders for quick reordering, and content management for writing blogs, articles, and updates. However, there’s some good and bad news when it comes to using Magento.
The good news? The Community version is free to use. All it takes to get started is a download. Setup on the other hand, can be complicated. It’s still free… If you know what you’re doing. Otherwise, you’ll need the help of a web developer.
The not-so-good news is that if you want the experts at Magento to set it up for you, it’s far from free. The Enterprise version is where everything is set up and managed for you. In order to even get a price quote, you have to fill out their contact form and have them get back to you, with reported prices ranging anywhere from $15,000 to $50,000 USD… per year.
How much does Magento cost?
The Community version is free but the Enterprise version (Which most stores use) is at custom pricing but expect to spend several thousand USD a year.
Some features of Magento include:
- The community version is OpenSource, meaning it’s free to use and is updated by the community frequently.
- Content staging and preview so you can see what the customers will see before making a product available.
- Customer segmentation so you can break customers down into groups for targeting purposes.
- Ability to add additional features as needed with a large collection of plug-ins.
When should I use Magento?
Because the initial setup can be challenging on a technical level, Magento is best-suited for larger stores; especially stores that have a lot of capital behind them. A large local retailer making the move to sell online with thousands of products will likely benefit from the features much more than a small boutique shop with a couple of handmade products.
Wix
Visit the Wix website and you’ll be met with a Get Started button front and centre that guides you through a series of questions to build you a personalised website. If you’re new to making websites, it might seem like magic that you can get a website up and ready in minutes. Further customisation takes some effort and a bit of a learning curve working on the proprietary platform, but having something workable in a few minutes is certainly impressive.
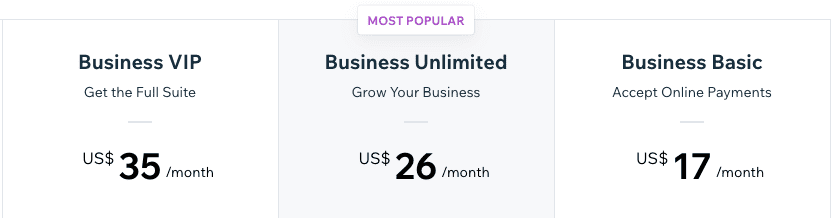
On the ecommerce site, Wix doesn’t have as many features as some of the heavy hitters like Shopify, but if you’re already using Wix, it’s easy to upgrade to add functionality for selling online at $17USD per month (for annual payment plans). They also have a connected app store you can browse to add additional features, though some come with a cost.
However, Wix uses a limited number of templates. This means your store and website will look like a lot of other ones out there. They also don’t currently have stock management alerts, so if you sell a product but don’t have it in stock, you could be stuck in a bind. The sites have limited options for functionality–meaning that if you need an unusual feature for your store, you may not be able to get it. Wix also wants to keep you around, so migrating your site somewhere else isn’t easy or straightforward.
How much does Wix cost?
Wix lets you connect a Domain for $4.50/month USD or use a branded domain (account.wixsite.com/website) for free. The most expensive plan (Business VIP) is $35/month USD and for e-commerce you’ll need the Business Basic at least, which costs $17/month USD. See full Wix pricing here.
Some features of Wix ecommerce include:
- No transaction fees–besides the monthly/annual subscription, you don’t have to pay Wix anything.
- Easy to add ecommerce if you already have a Wix website.
- Ability to sell physical or digital-only products.
- 20GB of online cloud storage included
- Easily connect your store to your Facebook and Instagram account.
- You can sell with multiple currencies across different countries.
When should I use Wix?
If you already have a Wix website and want to start selling online or you want to build a site on your own without much technical skill and have a small-to-medium store, Wix might be a good fit for you.
WordPress with WooCommerce
The best thing about WordPress is that you have endless customisation options to make your store look and act exactly as you want. The bad news… There are endless customisation options–so web development skills are a must. Learning how to use WordPress like a pro takes time, enough that many people build websites for people as a full-time job.
WooCommerce is a plugin that plays off the endless customisation so you can build a store exactly the way you want. You can have custom products, pages, checkout systems, sales funnels, whatever you want. You’re only limited by the capabilities of the builder, so getting a skilled web developer is important!
However, using WordPress with WooCommerce means that you’ll need to have a WordPress website already. You won’t be able to simply download WooCommerce and get a store ready from nothing the same day. Because of this, it can take some time to get your store up and going, but it will be powerful and versatile once it is.
How much does WooCommerce cost?
WooCommerce is a free plugin and includes basic e-commerce functionality. More custom features can be added with other plugins and some of those come with an additional cost.
Some features of WooCommerce include:
- Search Engine Optimisation tools.
- Free backup options.
- Thousands of plug-ins through WordPress.
- Custom fields for products.
- Use any payment gateway.
- Easy integrations with other software.
When should I use WooCommere?
If you want the freedom of customisation, the ability to scale for large operations, and the largest selection of add-ons and plugins, WooCommerce is the right choice for you. It’s also important to have some time set aside if you don’t have a site yet, as WordPress sites tend to take significantly longer to build than sites on other platforms.
Which e-commerce platform is right for me?
Because each platform has different strengths and weaknesses, we can’t recommend one above the rest. The right choice for you will depend on your goals, budgets, timeframes, and features needed. Depending on what those are, an affordable Shopify plan may suit you best, or you may need a fully-custom website using WooCommerce to best achieve your goals.
This is why it’s important to start with your goals first. If your long term goal is to have a multinational business selling your product around the world, a Wix site probably isn’t ideal. Likewise, if you have a side hustle and only sell a couple of small value items in a month, it might be, and a fully-custom WordPress site might be overkill and cost more than you’ll ever get back.
The other thing to keep in mind is who will be building your site. If you want to build the site yourself, the right choice might depend on your tech skills. WordPress and Opencart have a steep learning curve and you’ll need some web development skills. On the other hand, Squarespace and Shopify are drag n drop WYSIWYG builders, where you can add what you want and it will look the same on your website instead of working with code. And Wix guides you through building a site when you sign up and you can get something basic in a few minutes.
If you’ve narrowed down to a few options but can’t decide, we recommend trying them hands-on. All of these e-commerce platforms either have a demo site or a free trial.
- Shopify: 14-Day free trial without a credit card.
- OpenCart: Customer-facing Demo Site and Admin Backend Demo Site.
- Squarespace: 14-day free trial without a credit card.
- Magento: Community-made demo sites.
- Wix: 14-day money-back guarantee on Premium Plans.
- WooCommerce: Storefront demo and Admin Backend Demo site.
Once you find the right platform for you, it’s time to handle Inventory Management and Payment Gateways.
Glossary
e-commerce platform: A piece of software that allows for selling products online. Typically this will include product management and a way to accept payments.
Remarketing: Purposeful marketing to somehow who has visited your website or been exposed to your marketing at least once before.
Open Source: Code is available to view and use for free. This is compared to close-sourced where the public can’t see or access the code or repurpose it for their own use.
Plug-ins: A collection of code you can install to quickly add a particular feature or functionality to your website.
WYSIWYG Editor: A visual website editor that lets you create a website by moving images and adding text and have it display the same to visitors without needing to add code.
Branded Domain: A website address that adds a brand while offering a reduced price or other features. Yoursite.brandurl.com compared to yoursite.com
3. INVENTORY MANAGEMENT
To have a successful store, you need a way to track which products you have, their prices, their stock levels, and more. Inventory Management systems do most of the hard work for you.
Do I need inventory management system?
While having a dedicated inventory managment system is helpful, it’s not necessary for every store. All of the e-commerce platforms we mentioned above have simple inventory management built-in. And if you’re just selling a few things online that might be good enough.
Where a dedicated system becomes useful–or even necessary–is when you have a large or frequently-updating inventory or also have a brick-and-mortar storefront. For instance, if you have 5 of Product A and you sell one in the store and one online, how can you make sure you know that you have 3 left? With the basic built-in systems of the ecommerce platoforms you often have to manually do this yourself.
But with a dedicated system, they can integrate into a single, fluid system. Want to do a short-term sale? Prices can change everywhere. Need to change a barcode or SKU? Easy peasy.
If you have a small or simple store, you can probably skip this chapter.
But if you aren’t sure or are just curious about what’s out there, you might find some useful information.

What is Inventory management?
One of the biggest hurdles to selling online is how to handle inventory management.
This is especially true when there’s also a brick-and-mortar store. How do you coordinate in-store vs online sales? The last thing you want is to have someone buy something online, then find out that one of the items is out of stock and have to issue a partial refund. Or worse–they request to refund the entire order. Not only is that a potential sale lost, but it costs you time to apologise and process the refund too. How can you handle Inventory Management when things get complicated?
While you might be able to try to keep track of your inventory with a notebook and a pen, it’s a lot of trouble that can be automated away with an online inventory management system. Depending on your business size, a simple database manager may do the trick, or you might need a comprehensive digital suite to make sure everything is handled properly. Either way, you’ll need some kind of inventory management software to help you sell products online.
On the surface, it might seem like inventory management software just keeps track of stock. And the basic ones do just that. But more complex ones can do so much more. Some have a built-in payment gateway so you can accept payments without paying for another subscription. Others manage invoicing too. And some handle everything–sales, customer database, shipping and tax, etc.
Using an online inventory management system keeps track of how many of each product you have left in stock, and allows you to quickly change prices for sales. Many will also automatically track sales numbers and create reports comparing month-to-month performance. A solid offering will also integrate with your in-store stock so you don’t have to try to coordinate stock manually. The right choice for you will depend on the size of your business, the number of products you have, and whether you have or plan to have a physical store.
The big players in inventory management have customers from all around the world. Because of this, they offer solutions for international issues. There are many inventory management systems to choose from, but we’re going to compare some of the most popular options in NZ: Unleashed, Sortly, Vend, Cin7, Accredo, Ostendo, Infusion, and SAM Orion.
Cloud-based and Local systems
Before we get into comparing the specific systems, it’s important you know the difference between Local Systems and Cloud-based Systems.
A cloud-based system isn’t stored on a single computer. Instead, it’s on “the cloud”, meaning you are able to access it online from anywhere. If your system is on the cloud, you can access it at work, at home, on holiday, anywhere with an internet connection. Cloud-based systems also store your data online instead of confining it to a single system.
If the system is not cloud-based, you can only access the data on the computer it’s downloaded on. This can make it very difficult to manage elsewhere without some creative solutions like remote desktop–a program that lets a computer somewhere else see and control the computer–which can make them a challenge to use. If your system isn’t cloud-based and you don’t have a backup on another device, you can lose all of your data if the device breaks.
When possible, we recommend using a cloud-based system
However, there are always exceptions to the rule. Because of this, we’re including both kinds of systems, especially because many popular NZ options aren’t cloud-based–and many businesses are already using one of these.
Cloud-based Systems
- Unleashed
- Sortly
- Vend
- Cin7
- Infusion (Online)
Local Systems
- Accredo
- Ostendo
- Infusion (Not Online)
- Sam | ORrion
Unleashed
Unleashed is a cloud-based platform and one of the most popular options today. It’s a real-time inventory management system with dedicated options such as B2B e-commerce (for an added cost).
Features of Unleashed
There are many features available in Unleashed including a dedicated mobile app and business intelligence insights. The software allows for unlimited products, currencies, transactions, and more. It can handle barcode scanning, stock levels, product grouping, and markups. You can also see your stock in real-time, with an integrated physical and digital stock. If you already have something to manage your in-store stock, Unleashed has an API–meaning it is able to communicate and share data with other software and apps–and it easily integrates software and in-store management systems.
Unleashed has a dedicated learning section and the company also holds regular seminars in many localities including New Zealand. Managed Onboarding is also a required cost (additional $389) where you work via remote chat with an authorised agent.
Unleashed Pricing
Unleashed markets itself for mid-size businesses and above. The Mid-sized tier is $259+GST per month and goes up to Enterprise at $899+GST per month. Each of the plans has the same features, but higher tiers give more access to some features. For instance, Medium has 3 included users and Enterprise has 20.
Unleashed comes with a 14-day free trial with no credit card required. The free trial is in a Sandbox Environment–a test version of a site that isn’t live. This means that you can test any feature you want–like buying a million of a product–and see how the software would handle the situation.
Who is Unleashed right for?
If you’re a business owner of a medium to large business, Unleashed is a good option for you. With a higher price point and dedicated representatives, it’s ideal for businesses with large inventories and many employees as it manages everything across multiple channels and locations all in one place.
Sortly
Claiming to be a smarter way to inventory, Sortly allows for multichannel management of your inventory.
Sortly Features
Sortly pares down its features to essential options to keep the price down. Managing inventory is its primary function and it can set automatic alerts when product stock falls under a certain level or send reminders to reorder. Items can be grouped by category, physical location, and more. It can read barcodes and connect your physical stock to digital items. Product data can be imported and exported through CSV and data can be accessed on any device. The software can also create custom reports so you can quickly see top-selling items, inventory, and more.
One helpful thing Sortly offers is a free option with limited features. The free option only allows 1 user, 1 custom field, and 100 entries, but is an excellent starter for new businesses with limited products.
Sortly pricing
Sortly prides itself on affordability, and aims to keep costs low by focusing on essential features. Above the free plan, Advanced is at $39/month (USD) and increases entries to 200, custom fields to 10 and users to 3. Ultra is $119/month and has unlimited entries and custom fields, handheld scanner capability, and API access. For larger stores where integrating digital and physical stock is essential, Ultra is probably the way to go.
You can get a full 14-day free trial of Sortly on any plan. Keep in mind that the free trial requires a credit card so you’ll be charged after the trial period if you don’t cancel within 14 days.
Who is Sortly right for?
Sortly is a good choice if you have a smaller business or are looking to test the viability of selling some of your products online. It’s also ideal for selling products online only or if you have a smaller inventory and don’t need a plethora of extra features.
Vend
Focusing on the integration of a retail store with an online environment, Vend aims to seamlessly blend both types of sales.
Vend Features
Primarily a Point of Sale system, Vend strives to do more than be a POS. It’s designed to be simple to use and understand with an intuitive user interface. It allows for fast checkout and catalogue checks in real-time. For inventory management, it offers options to automatically reorder product if it falls below a certain point. Inventory across multiple locations and channels are managed on the cloud; even if you have a separate catalogue for online and social media, you can manage it in one place.
Since having a physical store is a focus for Vend, they offer many in-store benefits. A “register” is included with every plan, an in-store selling point where the Vend software can be loaded to a Mac or PC. They also have a Scanner app that reads barcodes and a customer-facing display for checkout.
Vend Pricing
Vend starts at $129/month for one location with one register on the Lite plan. For over $30k monthly turnover, Pro is $159/month. None of the plans have transaction fees. API access, gift vouchers, and app integration are available for Pro.
Vend has a free 14-day trial you can start after filling out some basic information.
Who is Vend right for?
If you already have a physical store and are looking for a better way to manage inventory, Vend may be right for you.
Cin7
For a comprehensive system that does inventory management and much more, Cin7 includes accounting, product management, a CRM, and more.
Cin7 Features
Cin7 is a robust piece of software that is used by major retailers worldwide. It does order management, Amazon integration, reports and analytics, forecasting, and warehouse management. It also has a cloud-based built-in inventory management system that updates in real-time.
For inventory management, it automatically updates stock and can create product groups, add promotional pricing, and organise and initiate dropshipping. Cin7 includes different stock levels for components, finished goods, and incoming stock as well so you can see inventory at different management levels.
Cin7 Pricing
Our most expensive system on the list, Cin7 starts at $375 for their Small Business plan. It includes 2 users, 3 connections, automation, and 24/7 support. Business increases users to 5, has 4 connections, a dedicated B2B online store, and automation at $695/month. Advanced comes in at $1245/month. It includes a dedicated customer success manager, web developer API connections, and 24/7 Screen reader support.
Cin7 doesn’t have a free trial, but you can book a free demo with a business email address.
Who is Cin7 right for?
While they have a plan called Small Business, Cin7 has features that startups and small operations likely won’t need. Consider it if you have a larger business, deal with multiple suppliers and/or warehouses, or prefer more functionality like accounting and a CRM in a single system.
Accreedo
Accredo combines accounting and inventory management into a single system. They have a network of partners and qualified support people around New Zealand, such as Online Computers in Invercargill.
Accredo Features
A windows-based software, Accredo combines software for business needs such as sales, financials, and inventory in one place. With automation features, it can integrate with other systems and mobile apps. Accredo can also be tailored and customised to your needs by the development team so you can get the features you need.
For inventory management, Accredo keeps track of stock, along with item sales. Inventory can be managed on the computer or via the Accredo mobile inventory application. Job quotes and costs are also visible within the system.
Accredo Pricing
Since Accredo is sold through a partner network, the price will vary depending on who you buy it from. It is not available to buy directly from the website.
Accredo has a demo version available for trial for free.
Who is Accredo right for?
Accredo could be a good option if you have a Windows machine and want accounting and inventory managed in one system.
However, as Accredo isn’t a cloud-based system and the API isn’t documented, it’s important to work with someone who is familiar with it and have worked with it before. This is especially important if you need it to connect to an e-commerce platform properly, which you’ll need to sell products online effectively.
Infusion
A small NZ team based in Canterbury developed and maintains Infusion software. Their software does inventory tracking and financials.
Infusion Features
Infusion has a couple of different packages depending on what you’re looking for. The Financials Package is designed for financial reporting. It manages staff records, produces financial reports, and has a cashbook with unlimited accounts. Accounting includes Financials along with a database of customers, suppliers, and products through inventory management. Infusion recently updated to focus on becoming a cloud-based service with full API support which makes it much more versatile than it used to be.
Inventory management allows for unlimited products. You can assign special pricing per customer so they can receive special rates on one or many products. Each product can be assigned its own serial number and expiry dates if needed. It can manage multiple locations, pricing structures, and pricing levels.
Recently, Infusion launched an Online version of their software. This version is cloud-based and accessed in a normal web browser like Google Chrome. The original software suite is still available if you need it, but we recommend the Online version unless you need specific functionality only available in the Elite package.
Infusion Pricing
Financials, Accounting, and Select packages are online only and cost $25/month, $55/month, and $75/month respectively. Financials includes a cashbook and GST reporting and reconciliation, while accounting adds inventory tracking and Select has stocktake, SMS messaging and more.
For the local versions, Professional costs $50/month and adds fixed asset management, marketing tools, and point of sale. The top tier is Elite at $85/month. With Elite, you get a document library and templates, performance reporting, and invoicing modules.
Infusion has a free 30-day trial of any plan you can download and try with no credit card.
Who is Infusion right for?
Infusion may be the right option if you’re an NZ business that needs the essentials of financial and inventory management. It doesn’t have the bells and whistles of some of the bigger names, but has essential features good for small to medium NZ businesses.
SAM | Orion
Headquartered in Auckland, Orion is part of the SAM suite of Auxo products with an emphasis on the vehicle industry. They claim to help get more sales through faster payments and less admin.
Orion Features
SAM software is all about automation. The Orion program has speciality sections for rentals, vehicle fleets, workshops, and dealerships as well as inventory management.
The inventory management of Orion is designed to combine online and in-store sales in a single place. It can handle multiple currencies as well as project future stock requirements with the option to raise or lower stock based on anticipated need. Orion has discounting and pricing structures built-in as well.
Orion Pricing
Pricing isn’t available on the website, but you can book a free 30-minute product demo by filling out a contact form.
Who is Orion right for?
If you’re an NZ business in the vehicle industry or have a workshop-based business, Orion has features tailored just for you.
Quick comparison of inventory management software
For a quick comparison of pricing and top features of the inventory management software, take a look at the table below.
| Name | Price (Month) | Number of Products Tracked | Trial Period | Features |
| Unleashed | $259-$899 | Unlimited | 14 Days | Cloud-based, Multiple Currencies; Optional B2B ecommerce; API Access; Document Designer |
| Sortly | FREE-$119 | 100-unlimited | 14 Days | Cloud-based, Desktop/Mobile Access; API Access; Cloud Storage; 30-90 Day storage; Auto sync data |
| Vend | $129+ | Unlimited | 14 Days | Cloud-based, Custom receipts, in-store register, barcode scanner, cash management, auto reordering |
| Cin7 | $375-$1245 | Unlimited | Guided Demo | Cloud-based, 24/7 support, automation, CRM, POS integrations, Warehouse Management, Payment Portal |
| Accredo | Not Specified | Not Specified | Demo Version | Invoicing, reporting, automation, sales tracking |
| Ostendo | $1500 (Year);
$300 renewal |
Unlimited | 30 Days | Stock takes, allows negative stock, unlimited supplier catalogues, multi-currency and tax rates |
| Infusion | $35-$85 | Unlimited | 30 Days | Kitset pricing, print barcodes, product catalogues, integrated cashbook |
| SAM | Orion | Not Specified | Not Specified | Guided Demo | Multiple currencies, full sales and costing analysis, vehicle industry special features |
How do I choose the best inventory management system?
If you aren’t sure which inventory management system to use, your best bet is to decide on the most important features you need. Cloud-based should be a priority in most situations since you can manage it from anywhere at any time. It also means your system is less likely to become outdated/incompatible as well as the extra safeguard for protecting your data with backups.
Once you decide on the features you need, doing a trial and working with the software is probably the easiest way to tell if it’s a good fit for your company. That way you can work with it first-hand and see if it’s easy to use and does what you need it to.
After you’ve tried them out and picked the right one for your business, it’s time to move on to how you’ll accept payments which is done through a Payment Gateway system.
Glossary
Inventory Management System: A piece of software that tracks inventories automatically.
Local System: A system that requires access to the computer the software is downloaded to for access and usage.
Cloud-based System: A system with access stored on the cloud that can be accessed from anywhere with an internet connection.
Sandbox Envrironment: A test environment where users can test different features without consequence.
POS: Point of Sale. This would typically be in physical stores, like an EFTPOS keypad at a cash register.
CRM: Stands for Customer Relationship Management. This is a comprehensive system to store customer information and data like past purchases.
4. PAYMENT METHODS AND GATEWAYS
Before you can sell your products online, you need a way to take payments. There are several different payment methods to make that happen and payment gateways to make sure those transactions are secure.
Payment Methods
Having multiple payment methods makes it more likely your customers will have an option that works for them.
- Debit and Credit Cards: Almost every website that sells online will want an option to take one or both of these. Since nearly everybody has access to one of these, it’s essential to to take them for nearly every site.
- Digital Wallets: Digital Wallets like Apple Pay, Google Pay, and PayPal are convenient card alternatives gaining in popularity. They allow for faster, more convenient checkout, especially for online stores where their fast payment option can allow them to skip checkout altogether in some situations.
- Buy Now, Pay Later: A Buy Now Pay Later Scheme works similarly to a credit card. You authorise the purchase at the store and then a company pays the cost immediately. Afterpay, Genoapay, Laybuy, and Zip are some common ones in NZ. Note that these take a higher percentage of the sale than most other methods, but they do get you sales you may have lost otherwise.
- Direct Bank Transfer: Your customers can pay straight out of their bank account using direct bank transfer. These simplify the transfer process so that they don’t need to get your account details and do it manually from the bank. Polipay and Account2Account are the two main options in NZ.
Payment Methods Comparisons
Not sure which specific payment method to choose? We’ve done some breakdowns of each so you can quickly see the pros and cons of each method.
Digital Wallets
| Name | Transaction Fee | Compatible Banks | Features |
| Google Pay | Same as Credit/Debit Card connected to | ANZ, ASB, BNZ, Gem Finance, Westpac | Connects to a wide range of debit and credit cards, Can add money manually, Pay in store or online, one click purchase, card number not shared, advanced encryption security |
| Apple Pay | Same as Credit/Debit Card connected to | ANZ, ASB, BNZ, Gem Finance, Westpac | Connects to a wide range of debit and credit cards, Can add money manually, Pay in store or online, one click purchase, card number not shared, private purchases, advanced encryption security |
| Samsung Pay | Same as Credit/Debit Card connected to | ANZ | Works with most EFTPOS terminals including some without contactless options, Can add gift and membership cards, Fast app checkout, advanced encryption security |
| FitBit Pay | Same as Credit/Debit Card connected to | ANZ, ASB, Gem Finance | Works with watch at in-person terminal. In-store only. No phone or wallet needed. |
| Garmin Pay | Same as Credit/Debit Card connected to | ASB | Works with watch at in-person terminal. In-store only. No phone or wallet needed. |
Buy now pay later
| Name | User Fee | Merchant Fee | Max purchase amount | Payment Terms | Features |
| Afterpay | None | ~$0.30 + 4-6% per transaction | Starts at $500, increases with more usage | 4 payments every 2 weeks | 1-5 business days for Settlement, no interest for customers, no fees for on-time payment, downloadable app, in-store and online, API Integration |
| Genoapay | None | 4-7% per transaction | $1000 | 10 weekly payments | Settlement within 2 business days, no interest for customers, no fees for on-time payment, downloadable app, in-store and online, API integration |
| Laybuy | None | 4-10% per transaction | $3000 | 6 weekly automatic payments | Instant Payment, no interest for customer, API Integration, No credit or fraud risk for merchant, Merchant dashboard, downloadable app |
| Zip | $6/month if not paid by end of month | Not Stated | $1000 | 4 payments over 6 weeks | No interest for customers, Daily settlement, Downloadable app, API Integration |
Direct Bank Transfer
| Name | Transaction Fee | Compatible Banks | Features |
| Account2Account | 1.20% | ANZ, ASB, BNZ, Kiwibank, The Co-operative Bank, TSB, Westpac | Connects directly with bank accounts, Settlement based on bank times, No customer fees |
| Polipay | 1% ($3 max), $10 minimum monthly fee | ANZ, ASB, BNZ, Kiwibank, The Co-operative Bank, TSB, Westpac | Connects directly with bank accounts, Settlement based on bank times, No customer fees, Pay now button, API Integration, Checkout from shopping cart, |
Payment Gateways
To accept any payment method securely, you need a Payment Gateway. A payment gateway is a system that accepts securely accepts payments without putting your or your customer’s data at risk. There are many payment gateways available, and all of them come with at least a small cost. Some charge a monthly fee while others charge a percentage of the transaction cost. While it may seem expensive to have to pay out for each transaction, it would cost you a lot more to take payments in an unsecured method.
What a payment gateway does is verify that a credit or debit card is valid and that there are funds available. Then, it securely transfers the customer’s funds into the merchant’s account. Think of the keypad processors from shops where you swipe/insert your card and type in a PIN. A payment gateway is the digital version of that!
As a merchant, you may have the option to charge the card manually, but you don’t have access to the actual payment data; debit cards for instance will be something like **93 or show the last 4 digits. Payment gateways are a middleman that protect both sides. Merchants are protected from fraud and chargebacks, and customers are protected from unwanted purchases and exposing their card data.
It’s important to use the right payment gateway for your business. Because of the sensitive nature of payment details, you need a system that’s safe and reliable. As a result, you’re better off sticking with an established company. The Payment Gateway should have a solid track record without fraud or scandal.
To help you decide the right option for your situation, we have a list of highly-rated payment gateways available in New Zealand. Each of these has many New Zealand clients and are stable, secure, and user-friendly.
PayPal
PayPal is an international company that does business in over 200 markets around the world. As they’ve grown, they’ve acquired many other platforms including Braintree, Venmo, and Xoom.
Features of PayPal
As one of the largest international payment gateways, PayPal has scale on their side. Millions of people around the world use the system and it’s easy to integrate with most e-commerce platforms. Merchants can receive money in over 100 currencies, which Paypal can also convert to a different currency for your bank account.
One of the benefits of PayPal is that you and your customers can access it anywhere online including a dedicated mobile app. Funds can be transferred easily from a merchant account to a bank account at anytime, with transfers to a bank typically being 1-2 days. PayPal also allows for subscription payments and can send invoices and estimates as well.
PayPal pricing
There are different PayPal charges and fees for different markets. For New Zealand, it is a fixed fee of $0.45 + 3.4% per transaction, with a maximum cost of $20.00 for domestic transactions and $120 for international. Customers pay no fee to use PayPal.
Who is PayPal right for?
PayPal is an excellent way to open your business to international customers or if you need a quick and easy solution that is compatible with a wide range of users.
Windcave
Windcave (formerly Payment Express) is a New Zealand payment gateway that combines e-commerce and in-store solutions.
Features of Windcave
Windcave is a popular option for point-of-sale devices and many merchants use a Windcave PIN pad in their store. They have physical terminals available in-store and for unattended systems like parking lots and vending machines. With options for e-commerce, in-store, or both, Windcave is a versatile option.
Windcave offers many solutions for e-commerce, including automated phone payments. Customers without computers or methods for paying online can do so via the automated system instead. It integrates simply into most major e-commerce platforms including WooCommerce, Shopify, Magento, and more. It can take payments from many major credit/debit cards as well as an Account2Account. Funds transfer speed is typically overnight.
Windcave pricing
Windcave charges a one-time setup fee of $99 and a $30 monthly service fee. From there, transaction costs are between 1.2% and 3% depending on the payment method used.
Who is Windcave right for?
Windcave is a good choice if you have a brick-and-mortar store (or plan to have one) and also want an e-commerce option.
Stripe
Stripe launched in 2011 and has grown to have global offices around the world. They have millions of users including Microsoft, Amazon, and Google.
Features of Stripe
Stripe emphasises e-commerce and focuses their efforts there, although they do also have a physical terminal system available. Along with their Payments platform, they have many other apps that can work alongside it including Radar for fraud and risk management, Identity for identity verification, and Sigma for custom reports. Stripe is cloud-based, so you can access your account anywhere you have internet access.
Stripe has a checkout page you can embed easily into your website to get started quickly. They also have 24/7 support available. Recurring subscriptions and invoicing are both options for Stripe through their Billing platform. The platform accepts major credit/debit cards and Wallets including Apple Pay, Google Pay, and Afterpay. Bank transfers are also available via a Stripe virtual account.
Stripe Pricing
Stripe has a pay-as-you-go pricing method with no setup fees or monthly fees. It costs 2.9% + $0.30 per transaction. Customised packages are available with volume and multi-rate discounts at different rates for certain businesses.
Who is Stripe right for?
With solutions for most situations, Stripe is a solid choice for any business type. It’s an especially good option for online-only stores where all transactions are e-commerce.
Paystation
Paystation was developed by TradeMe for e-commerce payments. It is used by thousands of NZ businesses for accepting payments online.
Features of Paystation
Designed with New Zealanders in mind, Paystation emphasises being New Zealand based. This includes the option to accept PoliPay as a payment option along with Diners Club, Q Card, MasterPass and Visa and Master Card. They support Visa Checkout for quick checkouts and several currencies including US dollars.
Paystation has several options so it can work with more businesses. The payment page can be fully-hosted on Paystation’s site, or a web developer can add a dedicated payment page on your website. The API integrates with many popular e-commerce platforms like WooCommerce as well as popular apps like Gravity Forms. They have a dedicated onboarding option to ensure that you and your team are ready to get started properly.
Paystation pricing
Paystation has four different tiers of pricing. Manual Payment is $19/month and payments are processed through the Paystation online Dashboard. Online Starter allows API integration so payments can be done on your website and is $39/month with 100 free monthly transactions and $0.45 each after. Online growth increases free transactions to $300 and lowers transaction fees to $0.39 and costs $99/month. The final tier is Online Enterprise at $149/month. With Online Enterprise you have 500 free transactions and pay $0.36 per transaction after that.
Who is Paystation right for?
Paystation is an affordable solution for NZ businesses with an option for any business size. They’re a good choice if you want to use an NZ business and easily connect with local banks and have access to a local customer support team.
Cybercom Pay
Cybercom Pay started in New Zealand in the mid-1990s. Today, they focus on e-commerce and help you with methods to get paid online.
Features of Cybercom Pay
Cybercom Pay prides itself on having fast settlement fees, with same-day funds transfer before 6 PM and next day for anything after 6 PM. The payment gateway allows for 12 popular currencies including USD and AUD. It also has API integration for developers as well as a “Buy Now” button for quick payment. Customers can pay with a valid Visa or Master Card.
One of the features of Cybercom Pay is a mini CRM. This database of customers helps you keep track of customer information. It also has invoicing software and you can send invoices directly from the system. As part of this invoicing, you can ensure that your invoices were delivered and see when customers view them or click on a payment link. You can also set up recurring subscription payments with Cybercom Pay.
Cybercom Pay pricing
CyberCom Pay has no monthly payments and no contracts. Setup is $99+GST and transaction rates are 2.85% for businesses and 1.29% for registered New Zealand charities.
Who is Cybercom Pay right for?
If quick settlement time is important to you, you do business in one of their 12 currencies and have customers who will only use Visa or Master Card, CyberCom Pay is a solid choice. It’s also an excellent option for New Zealand charities.
Paymark CLICK
Paymark CLICK is an online Payment Gateway in NZ used by small and large businesses alike. It is part of the Paymark series of commerce products and targets the e-commerce aspect of business.
Features of Paymark CLICK
Paymark is a popular NZ option and is used by thousands of Kiwi businesses. Paymark CLICK, their e-commerce product, emphasises simple transactions and fast settlement times. It has Online EFTPOS as well as supporting credit and debit cards. Settlement is done overnight so that you get your funds the next day.
One extra that Paymark CLICK has is Insights. This allows you to see sales, revenue, and settlement data at a glance. Since Paymark CLICK is a cloud-based payment gateway, you can access it from any device with internet access. The API is documented and Paymark CLICK easily integrates with Magento, WooCommerce, and Shopify. They also have 24/7 local support with support representatives in New Zealand.
Paymark CLICK pricing
Paymark CLICK has a setup fee of $125 and a monthly cost of $25. They request that you get in touch and chat with one of their representatives to find out about transaction fees.
Who is Paymark CLICK right for?
If you’re already using a Paymark product or want an online payment Gateway run by a New Zealand company with local support, Paymark CLICK might be right for you.
Bambora
Bambora, Now Worldline, is an international payment gateway with businesses around the globe using their systems.
Features of Bambora
Bambora is a versatile payment gateway and works with many other systems. It offers a wide selection of checkout options as well. You can have a completely customised checkout page, use iFrame for checkout, or an external checkout solution on an e-commerce platform like WooCommerce and OpenCart. The API is documented and includes guides for easy integration with popular platforms.
The payment gateway works with all major NZ banks and allows for many payment types including Visa, Mastercard, Paypal, AMEX, and more. While it works with small businesses well, it also has high-volume processing for larger businesses that need an enterprise solution. Bambora lets you implement custom fraud checks as well, including limiting how many times one customer can attempt a transaction in a given timeframe.
Bambora Pricing
There is a $49 setup fee and a transaction fee of 2.9% + $0.30 per transaction with a $25 monthly fee with Bambora. They also have alternative rates that may be suitable for high-volume processing.
Who is Bambora right for?
If you want an easily customisable checkout and don’t need direct account payment, Bambora may be a good option for you.
Flo2Cash
Headquartered in Auckland, Flo2Cash strives to be a global payments platform to help businesses worldwide with online and in-store payment offerings.
Features of Flo2Cash
Versatility is the primary goal of Flo2Cash, and they want to give businesses as many options as possible. The payment gateway can take payments from credit and debit cards as well as direct bank transfers. Flo2Cash has a documented API, and also allows for a custom checkout page. Payments can be done online, over the phone, or with a fillable PDF form.
With Flo2Cash, several steps of the payment process are handled for you. Subscriptions and recurring payments can be set up automatically. Failed credit card and debit payments will be retried automatically. Flo2Cash has payment plans for Batch payments as well as repeating, variable, and instalment plans. It also has comprehensive settlement reporting so you check the status of funds quickly.
Flo2Cash Pricing
Flo2Cash does custom pricing and does not advertise pricing without getting and touch and talking with a representative. Other sources show that they charge a setup fee of $200, a monthly fee of $30, and transaction fees starting at 3.4%. For accurate up-to-date pricing, you would need to get in touch with Flo2Cash directly.
Quick Comparison of Payment Gateways
For a quick comparison of these payment gateways, take a look at the table below to compare features.
| Name | Setup Fee | Monthly Fee | Transaction Fee | Transfer Speed | Extras |
| PayPal | $0 | $0 | 3.4% + $0.45 per transaction | Usually within minutes (To your own PayPal Account, not bank) | Online invoices and Mobile Payments included; lower rates with more sales, invoices and estimates, subscription payments |
| Windcave | $150 | $30 | $0.30 + 2.8% per transaction | Overnight | Automated Phone Payments; Batch Processing, in-store terminal, Account2Account |
| Stripe | $0 | $0 | 2.9% + $0.30 per transaction | 4 Business Days | Real-time reporting; Pay as you go; Multiple Payment Methods accepted; Anti-Fraud tools |
| Paystation | $99-$149 | $19-$149 | 75-500 free transactions, then $0.32-$0.45 depending on plan | Varies (Based on Bank) | 15 supported currencies, batch processing, cashflow reporting, Customer Support, API Integration, onboarding, |
| Cybercom Pay | $99+GST | $0 (If using CyberCom Pay Online) | 2.85%, 1.29% for NZ Charities | Same Day before 6PM | Subscriptions, Mini CRM, Mobile App, 12 currencies with no exchange fees |
| Paymark Click | $125 | $25 | $0.20+ | Overnight | Online EFTPOS, business insights, API Integration, 24/7 local support |
| Worldline | $45 | $25 | 2.8% + $0.30 per transaction | 3 Business Days | Customisable checkout, API Integration, 24/7 local support, Subscription payments, batch processing |
| Flo2Cash | $200 | $30 | From 3.4% per transaction | 2-4 Business Days | Customisable checkout, API Integration, Batch Processing, Subscription Payments, Direct Bank Transfer, Phone and PDF payment options |
How do I choose the right payment gateway for me?
Many of the payment gateways are strong contenders and we can’t pick one single best option. Each of them has different features, so the best payment gateway for you will depend on what you need. Some are global, while others are based in NZ. Since most don’t have a free trial, it’s important to research your choice thoroughly. Many of the websites have resources or video guides so you can find out what works best for you.
Something else to look for is to check that your payment gateway works well with your inventory management system. If integration is already built-in, it makes setup a lot easier!
Glossary
Digital Wallet: A virtual wallet that can have funds added to it for electronic funds purchases. Some can be connected to debit cards.
Buy now, Pay Later Scheme: Any payment method that makes payments on a customer’s behalf, then allows the customer to pay the company back in instalments.
Payment Gateway: A payment gateway is a system that encrypts and securely accepts customer financial details and payments.
5. BUILDING THE WEBSITE
Now that you know what products to sell and systems to store them, you need a website to actually sell them! But will you build it yourself or have a professional help?
Who's building the website?
The first thing you need to decide when getting your website ready is who’s going to build it. The right choice for that depends on a few things.
Which ecommerce platform did you decide on? With Shopify or Squarespace, for instance, most of those are templated sites. The design is done for you and then you replace the parts with your own pictures, videos, and wording. And they’re built with a Drag-and-drop Editor so you don’t need to know any code to do the basics.
Even then though, it helps to have a little bit of understanding of how websites work and how they are built. A lot of people hit a wall when trying to add features, so building the site yourself from a template is ideal when you have minimal changes.
For more complex sites like WordPress sites you’ll want the help of a web developer unless you’re familiar with building sites already. WordPress has a steep learning curve but it also has the most potential.
Another thing to keep note of is time. If you have to put the website together, it takes time away from other things you can spend your time on–like running the business. One of the simplest ways to decide whether to try it yourself is to decide what’s more important now: Your time or your money.
If you already don’t have enough time your website is likely to be pushed out and won’t launch for awhile. And everytime there’s a feature you want to add or something to change, you’ll need to spend time learning how to do it. It’s certainly easier to have an expert handle it for you, but costs more money.
On the other hand if you’re low on money you might find saving up for a professional site a challenge. Some website builders and marketing agencies have payment plans that can help, but if those are still out your budget you could try it yourself first. You could also build a site with a template builder temporarily until and upgrade to a professional site later on using the same Domain Name.
How much does a website cost?
Unless you’re going with a fully free website, websites have development costs (the cost to build) and ongoing costs to be aware of as well. A few places like wordpress.com offer “free” websites, but free sites always come with caveats and strong limitations. One of the main ones is that most will make you have a “yourwebsite.companyname.com” in your address.
At a minimum, you’ll have to pay for a domain–the actual website address e.g. www.mywebsite.co.nz–and for Hosting. Hosting is basically reserved space on a web server so that your website can be shown on the internet. Combined, this is typically around $100-200 a year, but can be more if you have a lot of content on your website.
One of the benefits of a custom site is that you only pay for the domain and hosting. That $0 monthly fee can certainly save you in the long run! However, there can be many other costs that go along with a website, such as paying for plug-ins that add functionality to your site.
If you build the site yourself, you can get one extremely cheap. But even the simplest platforms will take time to learn if you don’t have experience. On the other hand, having a professionally-built site will get you a higher quality site that will also be done faster, but you’ll have to pay more for the service.
Website costs -- Building the site yourself
If you want to try building the site yourself, you’ll want to use a drag-and-drop builder unless you’re already familiar with website development. Top drag-and-drop builders like Elementor go for as little as $49USD / Year. However, keep in mind that you’ll need to handle other required services with most of them such as web hosting to make sure that the website you build will be shown to other people.
Other builders like Wix and Shopify can handle those technical bits for you on the higher tiers, which require a monthly or yearly subscription. See the chapter on E-commerce platforms for more details on these.
Here’s a quick summary on costs of building your own website:
- A free website can be made on Google and some other platforms, with limitations, branding, and restrictions.
- You can build your own website for around $10-50 per month. You’ll have to design and update it on your own.
- Higher end e-commerce packages can around $250 per month. These tend to have more features but you’ll still need to build and design the site.
- Premium templates can be purchased and are usually one-off. They tend to start around $20 but can be a few hundred for higher quality ones. Some are subscriptions instead of one-off purchases, but these tend to be updated more frequently.
- In most cases, you’ll need to pay for a domain and hosting too, about $100-450 per year.
- This amount varies so much because it depends on the specific domain name, required server space, and other factors. For example, Internet.co.nz is valued at $11,400 USD as of this writing; back9.co.nz is under $100 per year. Most business names will be at the low end, while popular terms cost more.
Website costs -- Professionally built sites
Having a professional build your site takes the stress away from you. Professional web developers can built effective sites quickly and get you online fast. The cost of having someone build the site for you will depend on whether you get a Templated Site or a custom website, as well as any ongoing services you choose.
You can find web developers that can build you a simple site for $1000 or less. However, these will almost certainly be templated sites, and you won’t have much in the way of support afterwards. More expensive services or Marketing Agencies can give you a full-service experience. They’ll handle building, maintaining, and helping your site reach the target audience, but are a bigger upfront investment. Keep in mind though that professional sites with proper marketing tend to give better results in the long run, but may take longer to earn back your initial investment.
Here’s a quick summary on costs of a professionally built website:
- A very basic professional website can start at around $1000 in total, plus hosting and domain.
- A more complex, custom website without any content creation will start at around $3000. However, you’ll have to supply all of the content yourself like videos, writing, and images. It’s important that these things are optimised for the web, or you could have a lot of problems!
- Adding more pages, some customisation, copywriting, photography, and videos starts at about $7000.
- A basic professional eCommerce website typically starts around $5000.
- A custom-built eCommerce site with a unique design and advanced functionality start at approximately $8000.
- An advanced custom eCommerce site with a large inventory and automation features starts at about $15,000.
Build the website
Building the website is probably the most expensive and time-consuming part of getting ready to sell online. There a few different ways to approach this depending on your timeframe and long-term goals.
The traditional method is to have your website completely built with all components ready to go before launch. With this method, if you had a blog or News page for instance, you’d need to have several articles written and ready to go before the website goes live to the world. Doing it this way means your website will feel more complete when it’s launched, but it also puts you in a series of building, updating, and complete redesigns.
A newer approach is called Growth-driven Design. With this method, you start out by building a very basic structure of the website to get something out to the public. Typically this will consist of a basic home page, an About section/page, and a contact form or page. This Launchpad Site is designed to give you something for an online presence so people can find you online if they search for your business.
Once the launchpad site is made, growth-driven design takes data from your site visitors to inform you of next steps to take. This may mean adding more pages or more information to your contact page. Or maybe informative articles to build trust and credibility. The philosophy of a growth-driven website is that the website is always growing and evolving as opposed to stages of staying the same and then massive redesigns every few years. You can find out more about the growth-driven philosophy in our article: How Growth-Driven Website Design Works.
A traditional website will typically take a few months to complete, whereas a growth-driven site can be done in a few weeks to a couple of months depending on the workload of whoever is building it. What’s important for an ecommerce site is to have your branding and at least a few products that visitors can buy. You don’t have to put up every product before you go live; it’s perfectly fine to start with your most popular ones and keep adding more over time. We’ll go over adding products in more detail in the next chapter.
Integrate your systems
Hopefully when you chose your ecommerce platform, inventory management, and payment gateway, you made sure they integrated easily. Many of these connect with an API integration so they can share data without any trouble.
If you’re set on systems that don’t have a built-in integration, you may still be able to work with them with the help of a developer. They have to code that connection manually though, which will be significantly more expensive than systems that already connect, but sometimes this is worth it in the long run.
Before investing too much time on the details of the website and adding tons of products, you’ll want to make sure that your systems integrate and work together as expected. Otherwise, it can be a lot of wasted time and money!
Once your systems are connected and the basic website is built, it’s time to add your products (if you didn’t pay for someone to do it as part of building the site!)
Glossary
Drag-and-drop Editor: A visual editor where you pull components like images directly onto the page. These edits made on the editor will be the same as what visitors see instead of written code translating into what visitors see. These are easier for beginners to use, but much more restrictive than traditional code.
Domain Name: Also known as a website address. www.yourwebsite.com is an example. Each domain name must be unique, and www.yourwebsite.com and www.yourwebsite.co.nz are considered different domains.
Growth-driven Design: A philosophy of using data-driven insights to inform design over time. In growth-driven design the design is ever changing and evolving instead of static, piecemeal changes.
Launchpad Site: A basic site with minimal features to give your brand an online presence.
Hosting: Storing, maintaining, and serving files for a website. Hosting is required so that a website can have the proper protocols so it can be accessed on the internet instead of being saved on a single computer.
Templated Sites: Sites that have a pre-built structure where you add your own text and images. These typically will have placeholder pictures and words you replace with your own site. Fast and easy to build but not very unique.
Marketing Agencies: Full-service companies that can handle everything about websites from choosing a domain name to creating content to building and maintaining the website and getting it in front of your target audience.
API Integration: Code that allows a piece of software to communicate with another piece of software to sync data from one system into another.
6. ADD PRODUCTS TO THE WEBSITE
For people to buy products on your website, your website needs products! But make sure to take the time to add them properly.
Product Basics
The way that you add products is different depending on which system you use. For some, you add them separately to the system and then they sync your website. For others, the store integrates into the website so you add them directly to the website.
No matter which method you use to add products, you’ll want to add a few essential elements to each product:
- Price. Every product needs a price. Even if the product is free (like a download), you’ll want to add a price of $0.00 to track how many are sold. Most systems will have a Sale price feature where you can set limited-time sales so visitors can quickly see what kind of discount they’re getting.
- Product Description. While some systems let you publish products without a description, it’s not a good idea. Descriptions help explain what your product is and its benefits, but some website themes also use them for other places on the site and pull that description automatically.
- Product Imagery. Like the description, the product imagery is used on other places on the site so it’s important to take a good photo. We’ll cover this more later in the chapter.
- Product Categories. If you have more than one category, choosing a category will make sure it shows up on the correct place on the store. Depending on your store, if you don’t choose a category the product may show up in a default category or in the “View All” if your theme has one, but it’s still a best practice to add at least one category.
There are several other product elements that you can add but you likely won’t have to fill out every field on every product. You’ll want the above list as a minimum and then others depending on your shipping and inventory tracking methods.
Decide your price point
One of the fundamental aspects of any business is finding the sweet spot for pricing. Charge too little and you won’t make enough for the business to be viable. Too much, and you won’t get any customers.
If you’ve been in business for a while, you probably already have a good Pricing Strategy that you’ve been using. If not, it’s important to take the time to get this right. For online stores, visitors often get a feel for your price range after viewing a few of your products. HubSpot goes into this in detail in their ebook The Ultimate Guide to Pricing Strategies that can help you out if you haven’t set up a pricing strategy yet.
Shipping is another important thing to think about early. We go over shipping in-depth in the next chapter since the costs of goods and time spent sorting it out can add up quickly.
Product Descriptions
The product description is your opportunity to explain all the features and benefits of your product. Strangely enough, it’s also a section that a lot of companies in New Zealand approach a bit too casually. It’s not uncommon for even some of the big players to have one or two-sentence descriptions and miss out on crucial information; like the dimensions for a piece of furniture.
The written product description is also a major factor for SEO. Yoast and other SEO experts suggest a minimum of 200 words for any page that you want to rank in Google. And if you want people to find the product and buy it from you, then you want it to rank. This means if it’s possible to do so, you should find a way to write at least 200 words for every product you put up. It might not seem like a lot, but it can sure feel like it when you sit down to write them out! To put it in perspective, that’s about half of a page of a Word Doc / Google Doc with Standard Fonts and Margins.
Of course, if you’re a reseller with thousands of products, then it’s not viable to write thousands of 200-word product descriptions. Your best option in that case is to take the product description from the manufacturer and tweak it a little bit to make it your own. And if you can get to the 200-word mark in the process, more power to you!
However if you make the products yourself or are the sole seller of a product, it’s worth the time and effort to include as much information as possible. You can try writing about alternative uses or your experience using it or even why you developed it in the first place. The more details you can include, the more likely that you’ll hit on the one that a customer needs to know to make the decision to buy from you. Don’t skimp when it comes to the product description and you’ll see it pay off!
Product Imagery
Nothing kills a prospective buyer’s enthusiasm for a product faster than a terrible photo. Like with the product descriptions, product imagery is an essential part of making the goods in your online store stick out.
If possible, you should have a professional photographer take the photos for your products. This is especially important if you have a range of similar products. A professional will ensure that your product pictures all have the same look and feel, which makes your overall site look more polished. Ideally, you should take multiple images for each product too. And if the product comes in packaging, showing it both in and out of the packaging will help customers know what to expect and help them decide if they want to make the purchase.
When professional photography isn’t possible or is outside of your budget, (or you’ll be adding a lot of products down the line and it’s not feasible to keep having the same photographer come back) then DIY might be your best option. Shopify has an article dedicated to product photography with some tips on some inexpensive gear and a setup that will help make your product images look more professional.
And if it is in your budget, you can even go a step further for your top sellers and make a product video. Videos are proven to be the most effective form of content and can significantly drive up sales to your top products. If it’s in your budget to get a high-quality video, it can be an investment that easily pays you back several times.
Product Categories
Product Categories are typically used to sort your products so that people can find them on the site. And creating and sorting products into these categories is a constant challenge in the e-commerce world.
The goal is to make it easy for visitors to find what they’re looking for. If products are in categories that don’t make sense, the visitor may not buy from you in the end. Not because you don’t have what they need, but simply because they couldn’t find it.
There isn’t a one-size-fits-all approach to product categories. But we have a 2 tips from experts in the industry that might help.
1. Make the categories for your visitors, not your team
This is a trap a lot of businesses fall into when they first try e-commerce, especially if they have a physical store. If the store is set up a particular way, you might be tempted to set up the website the same way. Unfortunately, this doesn’t always work. For instance, if your in-store method is Clothing > Shirts > Casual > Short-Sleeve Shirts > T-Shirts > Nike T-Shirts that’s a lot of categories to sift through, and you might be stuck with categories that only have one or two products. On a website, something like Clothing > Shirts would be easier for visitors to follow. And if you want, you can put tags on the products so they can be sorted by Brand or Sleeve length.
2. Use Primary categories as a catch-all
Sometimes you have a product that doesn’t fit well into the categories you carefully chose. Instead of making a new category for one product, you can put it in a Primary Category. So if you have something like sleeve extenders that aren’t a shirt, you can put it in a Workwear category. But what if a product fits equally into 2 or more categories? Put it in all of them! There’s no penalty for having a product in multiple places, so put it everywhere users might look so they don’t miss it.
Other product elements that can be good to have
When you have the essentials covered, there are a few other elements that make your products stand out more and make your store feel more connected and easier to navigate.
Search function
Sometimes, a user won’t be able to find the product they want no matter how well you set up the categories. A search function can help for these kinds of situations. Usually a plug-in can add this but make sure to check how it works with your website; a bad search function can be worse than none at all.
Upsells and Related Products
On an individual product page, you can add Related Products to show beside the product, usually below the main description. Usually this will be accompanied by text like “People who bought this were also interested in…” and then show a snapshot image and price of other products. You can choose these yourself to make it easy for customers to make bundles quickly. Upsells are similar but are meant for higher-end products in the same category like a top-quality brand of the same product.
X left to free shipping
Of course, this only works if you have a free shipping option, but it can entice customers to spend a bit more to get free shipping. Most plug-ins that do this will calculate the amount left automatically. Some will even automatically display products at that price point so customers can choose something quickly and earn free shipping.
Clearance/Sale category
For the savvy shopper, a Clearance / Sale category can automatically pick up products you put on discount and display them here automatically. You can also choose to only put specific products in this section if you don’t want this to be automated. A good example is for clearance/overstock that you want to move out.
Shop All
The easiest way to make sure that a customer sees everything is to have a button to see every option you have. We don’t recommend having this as the default option if you have a lot of products because it can be overwhelming, but it’s still a good option so someone can explore everything you have without having to click through all the categories.
Glossary
Pricing Strategy: A strategy to determine pricing based on revenue goals, target audience, marketing objectives, and product attributes.
Standard Fonts and Margins: 12-point font (Typically Times New Roman) with 2.54cm margins on all sides.
Primary Category: An overarching general category that houses the products of all sub-categories beneath it.
Related Products: A section on a product page designed to entice customers to buy other products that work well with the product on the page they’re browsing.
Upsells: Showing other, higher-end products in the same range or category on a product page.
7. SHIPPING
Shipping can be one of the most stressful and complicated parts of having an online store. If you’re lucky enough to have products that don’t need to be shipped, you can skip this section–otherwise you’ll want to make sure to have this sorted before making your shop live.
Pre-shipping checklist
Before deciding on what to charge the customer for shipping, you need to find out how much shipping will cost the business. This will depend on the carrier you choose.
Even if you decided to offer free shipping, that free shipping won’t be free to you. There are many options for couriers in New Zealand such as Post Haste, Mainfreight, NZ Post, and New Zealand Couriers. No matter which company you go with, shipping is charged based on weight and dimensions–or what can fit in a package. Most companies will have a shipping calculator to easily calculate rates. Many have it as an API–meaning you can have these costs shown directly on your website if you plan on passing them directly to the customer.
As a business, you’re eligible to get discounts and additional services from many freight companies. They can also pick up your parcels for delivery on a regular schedule at your business. With the right setup, you can have tracking emails sent automatically too.
If deciding on courier options is overwhelming, a freight service like parcelpost or gosweetspot can help. These services have updated rates for their partner couriers and calculate freight fees in real-time. They can help you get the best value company for your specific item based on shipping time, cost, and extras. Of course, there’s an additional cost to use the service but some businesses will save in the long run because of the option to use different companies for different items.
At a minimum, expect to spend around $5 to ship a product to a customer, with increased costs depending on product dimensions.
Save out your product dimensions ahead of time
This isn’t essential if you’re using a Flat-Rate Shipping method, but it can save you time in the long run by helping you know what size box you’ll need for shipping.
If you’re passing charges onto the customer, you’ll need the weight and dimensions to calculate shipping. When you add a new product to your store, one of the first things you should do is save out the dimensions if you’re passing the charges on. If you have a good Inventory Management system you can add them there for easy storage and safekeeping. Some will even calculate shipping for you based on your chosen freight providers.
If you don’t, you’ll need to record these details somewhere and keep them in a database. It will likely take some time to get this done for all your products. But doing it upfront can save you time when it’s actually time to order, since you won’t have to weigh out your products and make sure you choose the right size parcel.
Packaging and Labelling
Many freight companies let you get boxes directly from them. As the boxes may be sized according to their pricing model, this is often a strong option for businesses to consider. It’s also the most straightforward option.
However, you don’t have to use boxes from the company. Some businesses have a steady supply of boxes on hand that they can reuse without having to pay for more.
On the opposite end, you can go all in and get custom-branded boxes and packaging. Companies like The Box Business, Fast Printing, and r3pack offer customised boxes and/or packaging you can use when shipping products. These costs can add up quickly, and aren’t ideal for every business, but can be an excellent way to get more branding out there and help your business to look more professional.
Most freight companies have specific instructions on how to label your items for shipping. You’ll need to follow these directions precisely to ensure the package can be delivered properly.
However, you can also add a label for your business if you’d like. You can make these yourself or use a service like vistaprint for custom stickers. These can be used as labels or as a more affordable way to brand your items compared to fully-branded boxes.
Determining how much to charge for shipping
Once you have the costs of shipping for the business, you need to decide how much of that to charge the customer. There are three main types of ways to ship items: You can do free shipping, you can do flat-rate shipping, or you can charge based on the dimensions and weight of the product. Each e-commerce shipping solution has its own advantages and disadvantages and the right option for you depends on the type of business and its goals.
It’s crucial that you take the time to properly decide which option to go with. Nearly half of people will abandon their purchase if unexpected costs at checkout are too high. When people do abandon a cart for whatever reason, almost 60% say it’s because of high shipping costs. While it might make sense to pass on these costs to your customer, it isn’t always in your best interest as you can lose a lot of sales. If high shipping costs are necessary, we’ll cover some ways to make these more expected to avoid sticker shock.
We’ll go over each of these in more detail in the next sections.
Free Shipping
Free shipping is the customer’s favourite! In fact, one survey showed that for 90% of customers, free shipping was the best incentive you can get when buying online. But if it costs the business several dollars on each sale, those sales can add up quickly–and the business can even take a loss on small-value transactions.
There are a couple of ways to combat this. One way is to increase the item price. You charge more for each item to help cover the shipping costs. On smaller items you may still have to eat some of the costs, but the larger orders should make up for it. While it may seem counterintuitive, one study showed that free shipping (worth $6.99) was considered more valuable than $10 off the product. Keep in mind this is in the US where services like Amazon Prime have made free shipping the norm, but the point remains that many customers see shipping costs as an extra fee instead of something that adds value. However, adding to the cost of the item is only ideal for e-commerce only stores; some customers are sure to cry foul if they find your in-store prices are cheaper than online.
Another option is to add free shipping for orders over a certain amount. This works two-fold; first, it helps stop the business from losing money on small sales. Second, it helps persuade some customers to spend more on your store. If their original order is $68 and they can get free shipping over $75, a lot of people will decide to get more from you to qualify for free shipping. And that might be another $15-20 instead of the bare minimum to qualify.
Many e-commerce platforms can handle this for you automatically if you want to go this route. You simply find where to tell it the minimum order amount for free shipping and it will update the cart automatically once an order exceeds that amount.
Free Shipping: Determining the free shipping threshold
A major challenge for many businesses is finding the sweet spot for the Free Shipping Threshold. If you put it too low you risk having to absorb those costs. If you put it too high, it won’t be enticing for customers. So how do you find the right amount?
The sweet spot is different for each business. It depends on your average order value, average shipping costs, and your margin. An article from the Fulfillment Lab goes into threshold calculations in more detail, but the formula comes down to this:
- Put in a number you think is reasonable for free shipping. Subtract your average order value from that amount ($100 (Free Shipping) – $75 (Average order value) = $25)
- Multiply that number by your margin ($25 * 0.50 (Your margin) = $12.50)
- Subtract that number from your average shipping cost ($16 (Average shipping cost) – $12.50 = $3.50)
That final number ($3.50) is the estimated cost to your business per order for offering free shipping. Ideally, you would want it to be a few dollars. If it’s a negative value, your minimum order is probably too high; if you start getting near $10 it’s probably too high. It may take some refining, but free shipping can work in your favour by enticing people to buy more!
Flat Rate Shipping
With flat rate shipping, you charge a flat rate for shipping on every order. There are no calculations required; shipping costs are the same every time and help you make some of the costs back. In New Zealand, flat rate shipping is a tad more complicated. You’ll usually see four different flat rates: Urban on the same island, rural on the same island, urban on the other island, and rural on the other island.
As this is a normal practice in the country, your customers won’t be surprised to see it. But if you want to go that route, how can you make sure your customer chooses the right option? The easiest way is to have this determined automatically. If you’re using or plan to use a WooCommerce website, you can download the plugin NZ Shipping Zones for WooCommerce plugin. This e-commerce shipping solution was developed by Kiwi web developer Daniel Shaw and takes data from NZ Post’s Postcode Listings for Rural Deliveries. It’s a huge time saver, especially when combined with something like the NZ Post addressing API that auto-fills and corrects addresses based on what NZ post has on file. With this combination, customers simply start typing their address and choose it from the autocomplete list, then the appropriate shipping is chosen automatically.
Flat rate shipping is convenient because customers don’t have to worry about calculating shipping costs. As long as you make it clear what the prices are upfront, customers can browse your shop without getting hit with an unexpected charge later on.
Flat Rate Shipping: How much should you charge?
There’s no question that flat rate shipping is convenient and easy to use for customers. But how do you make it easy for the business and charge an appropriate amount?
If you’ve already found the shipping costs to the business, you’ll be better set to decide how much of the cost to pass on to customers. Some businesses do it so that small, low-value orders actually make money for the business with flat rate shipping. This helps balance out orders with larger items that will cost the business more.
Other companies keep shipping rates lower to cover some of the cost of shipping. This method covers more of the cost than free shipping but customers with low-value orders may go elsewhere if they think shipping is too high. Some do flat rate except for oversized items, which have calculated shipping. Just make sure to let customers know as soon as possible if their item incurs extra shipping fees.
Calculated Shipping
Calculated Shipping is the easiest way to make sure your costs are covered and that the customer won’t pay more for shipping than the service actually costs. While this is a straightforward way of doing it, it’s also the most likely way that customers will abandon their purchase.
Again, this comes down to expectations. With calculated shipping, visitors can only guess at what the cost will be; if it’s too much higher than they think they’ll probably look somewhere else for the same or similar product. If your items are small and light, calculated shipping can be a good option for everyone. It might be cheaper than flat rate for you and you can pass those savings on to the customer.
Likewise, if you have very large items like heavy appliances, customers won’t expect them to be sent over for a $5 shipping charge. You’ll likely need to work with a freight company that specialises in large packages like Mainfreight or FedEx Express. Depending on the item, you may need to reduce the price on these large items for shipping as well–often customers aren’t thrilled to find out shipping costs more than the product!
Local Pickup
If you want to avoid shipping altogether, you can have Local Pickup only. This is a good option if you already have a strong presence in your local area. So why do this at all instead of having people come to the store to purchase?
Selling online with local pickup offers a few advantages. One of the biggest is that people can shop anytime. According to SaleCycle, the peak time for shopping online is between 8 and 9pm. People are at home and settled in, ready to shop. If your business is available to sell products for these hours, you might pick up some sales. Even if they can’t physically pick it up until the next day or later, by being available when people are shopping you open yourself up to more local sales.
Even if you decide to include a delivery option, also having local pickup may be a good decision. One benefit of doing this is that some people prefer to take it slow and go through your inventory at their own pace. Even if you aren’t pushy in person, for some it’s a better experience to search through your inventory at their own pace out of the store.
Some locals might prefer online shopping but would rather stop in and pick up their order instead of paying for shipping. Or they might be looking for a particular item and want to make sure you have it. Checking online is much more convenient than dropping by to see, and some will go with someone else instead of taking the risk. Having the pickup option makes it simple for them, and you can save on packaging and freight at the same time.
Setting up shipping
Once you’ve decided on a shipping method, you’ll need to enable it on your website. This process will be different depending on which e-commerce platform you use. Most of them will have a “Shipping” tab or have options for Shipping within the settings when you log into the website. The best way to set up shipping is to find the resource written by the platform. Here are some instructional guides for the most popular platforms in NZ:
- WooCommerce – How to Implement a Shipping Strategy
- Shopify – Ecommerce Shipping and Fulfillment: A Complete Guide
- OpenCart – Shipping
- Squarespace – Setting up shipping rates
- Magento – Setting Up Magento Shipping
Refining your shipping costs
After setting up shipping, make sure that your costs and expenses are well-balanced. The only way to know for sure if you set appropriate charges is to try out your strategy with customers. You might find out that your charges or free shipping threshold are too high. Or that they are too low and nobody ever qualifies.
Depending on the results, you have several options you can try. You can try engaging a small base of customers with free shipping discount codes. Or offer a percentage off for regular ordering or subscriptions. Or you might want to consider changing carriers if they aren’t meeting your expectations.
Once you get everything working and find the best e-commerce shipping solution, delivery simply becomes a normal part of business–only now you can have customers over 1000km away!
Glossary
Flat-Rate Shipping: Charging a flat amount for shipping regardless of what the cost is to you. Depending on your rate you may make or lose money on shipping depending on the order size and amount.
Free Shipping Threshold: The dollar amount a customer must spend in a single order to qualify for free shipping.
Local Pickup: An option to avoid shipping by having customers pick up the product at the store. Sometimes known as Click and Collect.
8. CHECKOUT PROCESS
Getting the item in the cart is the first step. But how can you help make sure the purchase will go through and be a success?
Why is checkout important?
The checkout process is one that can be overlooked because it might seem like once someone adds something to their cart, they’re committed to buying it from you. In fact, the opposite is true. It’s estimated that as many as 70% of carts are abandoned. Almost three-quarters of people who add products end up with an Abandoned Cart–they don’t finish buying them!
So why are these rates so high? What leads someone to put in the effort to add products to a cart but then change their mind at the last moment?
There are a few reasons why potential customers abandon carts. Some are typical behaviours that you have no control over. But there are several ways you can significantly cut down the abandoned cart rate by having some quality-of-life features to your website–and avoiding some common pitfalls.
Unfortunately, the number 1 reason people abandon carts is that they’re in the browsing phase. They aren’t ready to buy anything yet but might want to collect items for things they plan to buy in the future. They might also want to create a bundle of products and compare the final price between your store and others.
Other reasons include:
- Unexpected charges like shipping
- Forced account creation
- Long or confusing checkout process
- Security Concerns
We’ll go over each of these in more detail in this chapter.
Unexpected Charges
When someone already shows interest in a store, the top reason for them not buying from them is because of shipping or other unexpected fees. Most people are aware that shipping exists and is a thing they have to pay, so that’s not the main issue.
The problem is the way that it’s presented. An example would be not including the shipping costs in the cart. By the time someone adds the product to the cart and looks at the total, they tend to be happy with the cost if they continue to go through the checkout process. So if they’re already resolved to pay a certain amount and see something like a $15 shipping charge they weren’t expecting, they can feel deceived and not finish the purchase.
The same goes for other unexpected charges. Not saying prices are GST exclusive is a big one for New Zealand. Most brick-and-mortar stores include taxes in the price. So if your online store doesn’t for some reason (such as primarily B2B business), make sure it’s extremely clear!
Fees and additional charges should be stated upfront too if they’re part of the price. Passing on credit card surcharges for instance should be stated as soon as possible so that you don’t give customers a reason to leave. Sometimes, even if a store has the best price, losing that trust will mean a customer goes elsewhere and willingly pays more! That customer trust can be extremely difficult to earn back, so it’s best not to lose it in the first place.
Forced account creation
When someone is browsing a store or were told about a specific deal, they might not be sure that they’re coming back. For these people, forcing them to create an account as part of the checkout process can put them off of your site for good.
Account creation is an investment, especially if the user doesn’t have Autofill turned on. And the more steps you put in place to protect your website and store–like sending verification emails before accounts can be registered–the more annoying it will be for the customer who didn’t want to do it.
Guest Checkouts are a good way to get around this. These let customers who want to buy from you do so with minimal effort so you can get the purchase. You can even mention the benefits of signing up for an account in the confirmation email or send a follow-up email after the product is expected to arrive. If someone wasn’t sure about signing up, giving them time to have an experience with you (or a coupon code with sign up!) might change their mind.
Long or confusing checkout process
Most people prefer to take the path of least resistance when they have the option. This is especially true when it comes to store checkouts. The more steps you have in the checkout process and the more fields a customer has to fill out, the more irritating it becomes for them.
The standard WooCommerce checkout process has a Cart page and a checkout page that has 10 fields. This process works for a lot of stores, but you may want to customise that. You should aim to have the fewest number of fields you need. For instance, if you offer virtual products, how important is it to have someone’s phone number and postcode? If you see fields you don’t need, you can remove them.
The same goes for how many steps the checkout process is. The average checkout process has over 5 steps. 3-to-5 steps is used by most major retailers (including the cart page) these days. Fewer steps can give the impression that the site is insecure. More than that becomes irritating, and both can lead to leaving the store and going elsewhere.
1-Click checkouts are a great way for customers to bypass the checkout entirely while still giving you all the required information (and payment) that you need. You can add these buttons to individual products or as the first stage of your checkout process with the cart to simplify the process. Not everyone likes this fast-paced option, but Amazon claims it gave them a significant advantage. Now that their patent is up, any ecommerce site can add a 1-click option if they want to.
Security Concerns
If a site seems dodgy or scammy, most people think twice about putting in sensitive information. This is especially true when payment details are part of the process. Some people are hesitant to buy online at all, despite the conveniences of online shopping. Others are hesitant, but overly cautious.
Security concerns are actually one of the top reasons people abandon carts. There a few things you can do to ease these concerns and show that your site is safe and secure:
- Make sure to have an https address. This puts the padlock next to the website’s address in major browsers like Chrome and Safari. Unescure sites will have a warning next to them, and may even give potential visitors a warning before visiting that the site is unsafe. An SSL certificate will add that padlock and help put people’s minds at ease.
- Add “signals” that the site is safe in the checkout stages. Showing the VeriSign logo if your site is verified helps people who know what VeriSign is. However, Shopify showed that adding a simple padlock to the credit card form with a short message about the site being secure did more to reassure users than VeriSign or any other verifiable process.
- Proofread your site for spelling and grammar errors. If your site is full of spelling and grammar mistakes, it looks unprofessional. And for many people, an unprofessional site is less safe. Taking the time to minimise errors helps show your customers you’re a professional that cares about the business and the website. Most people will forgive a few small errors, but less is more!
Customer Experience vs Reengagement Features
There’s a tug-o’-war battle going on with modern ecommerce websites and the customer experience. Customers wants a simple, streamlined process where they can get what they want quickly and easily. Store owners, on the other hand, want to minimise abandoned carts and capture useful data. A lot of times, these two situations are at odds with each other.
Abandoned cart emails can be a good balance for customer experience and helping you reengage customers. These are automated emails that are sent out to someone who nearly finished the checkout process. Sometimes, they simply forgot to make the purchase and the emails are a good reminder. The catch? You need the person’s email address.
For store owners, getting the email address as soon as possible means that the abandoned cart email can go out to people who don’t get as far in the checkout process. But for customers, it can feel strange to include information like their email before they’ve decided they want to buy. An option is to add an extra step to the checkout process asking for the email before information like address and billing information, but it can be risky and the effectiveness will depend on your audience. You might get more recovered income from carts that were abandoned this way, but you might have fewer people going that far into the process at all because of the extra steps that might seem intrusive.
That’s why it’s important to always monitor how your site is doing and making sure that your processes and functionality are performing well, something we cover in more detail in a later chapter.
Glossary
Abandoned cart: When a customer adds items to a cart but never completes the purchase.
Autofill: Saving passwords, addresses, and credit cards to your browser or profile and having it recognise and add all related data to form fields automatically.
Guest checkouts: Allowing someone to make a one-time purchase from a store with only the necessary information for the purchase without making an account.
1-Click checkouts: A convenient way to buy with a single click, bypassing the typical checkout process. The customer stores their information in a system like Apple Pay or Paypal, and the button connects to the user’s profile on the system and allows them to buy using the saved information in a single click.
9. TESTING YOUR STORE
Before you go live, you want to iron out as many bugs as possible so customers don’t get irritated or worse–unable to make a purchase at all.
Is testing actually important?
Ideally, once your store is built, everything will function perfectly. But ask a website developer, and you’ll find out that this is rarely the case. Even seasoned professionals miss small details or forgot to make small updates when making sites.
On normal websites, errors tend to be a nuisance, but not a serious problem. Maybe a link is broken so someone can’t read an article they wanted. Or text is hard to read because a picture overlaps it slightly.
With ecommerce sites, a bug can mean people can’t complete an order at all, get it sent to the wrong place, or get charged more than once. They can seriously hurt your reputation or worse, so it’s worth taking the time to properly test everything.
If you had your website built professionally, your development team should handle most of the testing for you. However, if you built the site yourself or just want to run some tests, there a few things you should look for.
Testing website functionality
As part of website testing, you’ll want to make sure that everything looks and works right. Be sure to check every page on your website and look for things like page links and images.
Something else to check for is Lorem Ipsum that may be leftover from early stages. This realistic-looking but meaningless text gets passed over sometimes because it looks like real phrasing but is just used for testing.
Other things to check for include:
- Testing forms and making sure submissions go to the right place
- Making sure the Responsiveness works as expected and nothing looks broken on different screen sizes.
- Menu and Service names are correct
- Spelling and grammar
- Information and logos etc. are the latest up-to-date versions
Security and website maintenance are also extremely important to consider. We go over backups and other website maintenance in detail in our ebook: Website maintenance: It keeps your site going and going and going.
Test Purchases
Perhaps the most important part of testing an ecommerce website is to make sure purchases work properly. Hiccups in the buying process can make your site look unsecure and unsafe, or just too annoying to use.
A few things to check for in the buying process:
- Adding to the cart is simple and intuitive and works as expected–such as not being able to add negative items to get a refund!
- Taxes, fees, and shipping are calculated correctly. If you use Zone Shipping, make sure to test every zone at a minimum for the right pricing.
- Checkout process is simple and straightforward and only has necessary fields marked as required.
- All emails like confirmation orders have the correct information and are sent to the right person.
- Payment gateways have all the required information to deposit money to your account and aren’t in Test Mode.
Doing several test orders is also a good idea to make sure everything goes through as it should. Most payment gateways such as Stripe have documentation showing you how to set testing mode or fake credit card numbers that tell the system the order isn’t real so revenue tracks correctly.
Along with testing the customer side of it, make sure that all the required data shows up in the back end too. Ensure that customer details line up, the shipping label can be generated, and that you can find all the order details that you need.
Run as many tests as you need to, because if you notice something feels off then it’s almost certain one of your customers will notice it eventually too.
Account Creation
Account creation is a default option for most ecommerce platforms. However, it’s one that often goes overlooked, especially for businesses with a small line of products.
Popular platforms like WordPress with WooCommerce have a user Account Portal by default but it is a barebones one without many features. If you haven’t put much thought into account creation, at a minimum you should test if it is possible for a user to log in and what they can when logged in. There have been instances where someone who logged in has had control of making changes to the website, so it’s important to check this for security purposes too!
When you’re sure that the customer experience is working smoothly and doesn’t have any issues, it’s time to launch the site for the world!
Glossary
Lorem Ipsum: Fake placeholder text used to give your website the appearance of having content before the real content is put in. Often used for testing and prototyping phases.
Responsiveness: Part of web development that involves adjusting text, media sizes, and layouts automatically to fit different screen sizes like phones compared to desktop computers.
Zone Shipping: Charging different flat rate amounts for different shipping regions, such as a surcharge for rural addresses.
Test Mode: Test mode is used in payment gateways to simulate the full purchasing process for customers without any money exchanges.
Account Portal: An area only available to users who have an account and are logged in. This where a person can typically change preferences and profile settings.
10. AFTER LAUNCH
Once your store is live, pay attention to important metrics to see how you can improve and make more sales.
Tracking website performance
Once you’ve completed all the other steps, congratulations! It’s time to get the site live. You can relax and breathe for a little while.
But the work doesn’t end here. Once the site has been live for a bit, you’ll want to check and see how it’s performing. One of the best tools for this is Google Analytics. Having a Google Analytics Tag is a best practice for any website so you can see how your users find your site and what they do once they arrive.
For ecommerce, Google Analytics can track even more information–as long as you set it up to do so. Enhanced E-commerce can be extremely beneficial to see if your checkout proccess, layout, and products are performing well. However, it is also very complicated to setup and requires a knowledgeable developer or a plug-in to do the work for you. Both of these options tend to have a cost but will save time and headaches compared to attempting on your own if you don’t know about web development.
With Enhanced E-commerce, you can track very specific actions. You can see how many people visit a specific product. You can see what product categories are most popular. Abandoned carts show up too. So does checkout dropoff, which shows how many people make it to a specific point of the checkout process. This can be useful to see if something unusual is happening; if half of people start checkout and leave before the purchase, it might mean the checkout is too complicated or you’re charging too much for shipping.
It takes time and effort to analyse all of this information and make changes accordingly, but it can be well worth it!
Website enhancements and next steps
So what do you do once you’ve tracked how users are behaving? Decide if you need to make changes. Maybe people are going to the site but aren’t viewing the store. Or you get a lot of people looking at products but not adding them to the cart.
By keeping track of your website performance, you can decide what to do next. The more in-depth you analyse your data, the more you can make informed decisions. You might find you need to update your checkout process, or maybe the names on the menu simply aren’t clear.
You can also consider adding Automation or more intricate plug-ins for repetitive tasks. These can help do things like send reminder emails about abandoned carts or a welcome message to your first customer, or prepare your shipping labels automatically. When you have a high enough sales volume, you can start to sink time into these tasks. By spending time or money upfront to automate repetitive tasks, you can reduce repetition and save in the long run.
We talk more about automation in our article How can automation save you time and money?
Bringing in new customers
Advertising is a great way to bring in new customers. Google Ads are extremely effective for the right businesses. Google Search Ads can put your site at the top if someone types in a product or service related to what you do. This is a shortcut to getting to the top of search results, but in the long term, it’s more reliable and cost-effective to invest in a good content strategy.
For ecommerce sites, Google Shopping Ads can also have enormous returns. They are particularly effective if you have something unique for your store, like having brands no one else has or having the lowest price. It’s not uncommon for these ads to have over 10x ROAS if the ads are setup right. Shopping ads can also connect directly to many product inventories automatically, so you don’t have to worry about adding new products or adjusting stock levels. We go into Google Ads in more detail in our article Does Advertising on Google AdWords really work?
If you’ve made social media profiles, Facebook Ads can also be quite lucrative–if you keep up on your posts. The more followers and active you are, the more Meta rewards you for your efforts. We explain this in more depth in our article All about Facebook Ads: Give your posts a boost!
For both Google and Facebook ads, there is a fair amount of setup and adding tracking code to your site before they’ll work and track purchases like they should. However, for good quality websites with decent products and prices, they tend to bring a positive return that’s worth the effort.
Glossary
Google Analytics: A free service from Google that tracks important website information like page views and link clicks.
Google Analytics Tag: Code that connects your website to a specific Google Analytics account. Required to track user behaviour.
Enhanced E-commerce: An advanced setup in Google Analytics that tracks many metrics like product views, steps in the checkout process, and conversion rate of website visitors.
Automation: Using software or AI to accomplish certain tasks automatically.
Google Shopping Ads: Ads on Google that show products, prices and the store name that show up at the top of search results.
ROAS: Stands for Return on Ad Spend. ROAS is amount you spend vs the revenue brought in. $100 spent on ads with $1000 in sales would be 10x or 1000% ROAS.
Wahoo! Thanks for reading, champ!
If you’ve got some questions or feedback get in touch with us today.
Contact us